*Guest Post by Jeromy*
I was never a Boy Scout. Those whom have had to endure the distinct sacrifice of camping with me (yes, I’m figuratively pointing at you Abe Smith and Guy Schoenborn!) are well aware they are in rarefied company because I simply don’t camp, period. While it is true that for several uncomfortable years I made a slipshod attempt to impersonate a Scout leader to fulfill a church calling, I truly do believe in the principle espoused by all Boy Scouts across the globe, “Be Prepared.” So when Jocey and I made the decision to travel around this wonderful world of ours with our children for a year, with only what we could carry on our backs, I kicked into preparation mode to become an expert in ultra-light packing!
I spent several months combing through every packing website, blog and travel accessory site in every dark corner of the interwebs and arrived at self-proclaimed “expert” status. However, the tentative nature of my newfound standing as an ultralight travel expert was heretofore untested. Although I felt confident that I had prepared appropriately, until the rubber met the road and we left on the journey, there was no way to really know. We did make a trial run to Washington, DC for one week in April of 2016, just a few months before we left, and our approach seemed to work well. One step in the right direction!

Now, after nearly eight months on the road and experiencing relatively smooth sailing, I feel confident to share how to pack for any amount of time on the road in only a carry-on size backpack or bag. I can assure you that it definitely can be done, with room to spare.
Ultra-light Packing Principles
To ensure you are packing efficiently use these principles:
- Use packing cubes
- Always roll clothes, never fold them
- Keep bulky items at home and minimize footwear (the bulkiest items in your bag)
- Place small articles in shoes
- Choose smaller version if possible (tiny ear buds vs. bulky studio style headphones)
- Wear bulkiest articles on travel days whenever possible (wear shoes not flip flops)
- Bring only clothing that is packable, ultra-light, wrinkle free and comfortable
- Choose only one color scheme so everything matches (I chose gray/black)
The Backpack
After significant exploration into a variety of backpack options for this journey, I narrowed the list of features I desired down to these:
- Maximum carry-on size: to avoid checking bags for security and efficiency
- Front loading: for easier access to my gear
- Lightweight: for obvious reasons
- Lockable zippers: for security
I chose the Tortuga Travel Backpack (44L Carry-On Sized) because it possessed all of these features, and I have been very happy with my choice. I love the front loading feature, large front compartment and zippered side and hip pockets, which greatly enhance its capacity for carrying smaller items in an organized manner. The only feature I believe it is missing is strap adjustment at the shoulders, but overall, I would give it 4.5/5 stars. Right now it is also available for a reduced price of $149 at Amazon (click here). Jocey and Parker chose the Osprey ($160) with all of the other features that is lighter, just as durable and about the same price. Honestly, due to the shoulder adjustment feature of their pack I think it is slightly more comfortable than mine. Click here to check out the Osprey Ozone 46.

Undoubtedly, the packing question Jocey and I have received more than any other is definitely, “How do you only have seven days worth of clothes and travel for a year?” The answer is simple, but esoteric unless you are a travel geek: only pack for one week and launder your clothes every 7-10 days.

We tried exceedingly hard to find lodging with a washer and dryer whenever possible so we could launder our own clothes. It is easy to purchase detergent at grocery or even convenience stores. In an emergency, we also brought some super concentrated travel detergent which we have used when we did not have access to regular detergent. You can find it at REI (recommended to save shipping costs) or here if you are interested. Up until our time in Asia, we probably had a washer and dryer in our apartment or house 2/3 of the time. In Asia and when we get to South America, this feature has been harder to secure. Luckily, in these regions of the world it is inexpensive to have your clothes laundered at a laundromat. Jocey and I both prefer to outsource laundering whenever we can and it is not too expensive because it is one less thing we need to bother with each week. On average, we spend about $10-20 every 7-10 days when we send laundry out, which is almost always cheaper than having your hotel launder it for you. Hotels often charge a fee for each item, while most outside laundry services charge by the pound or kilogram. The most expensive laundry bill was around $100 at our hotel in Kasane, Botswana (we didn’t check the prices!) and our least expensive laundry bill was about $6 in Johannesburg, South Africa.
In addition to our primary backpack, our packable daypack has come in handy throughout the journey and is an item we use regularly when we head to the trail, the beach, the city or the occasional amusement park. This 20L Packable Daypack by New Outlander has been stuffed full of water bottles, clothes, beach towels, buckets and sand toys, snacks, wallets, sunglasses and the like for eight months. While it is now starting to show wear at the seams, for around $15 it will last the whole year under extreme conditions. There are similar volume daypacks available which pack slightly smaller; however, I worry about their durability and for this reason, if you can spare a few inches of space, this one will serve you very well.

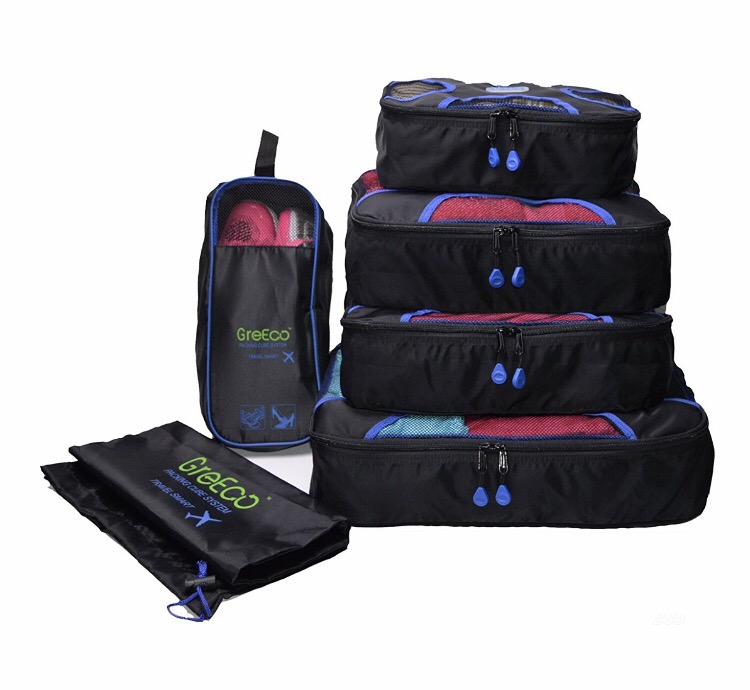
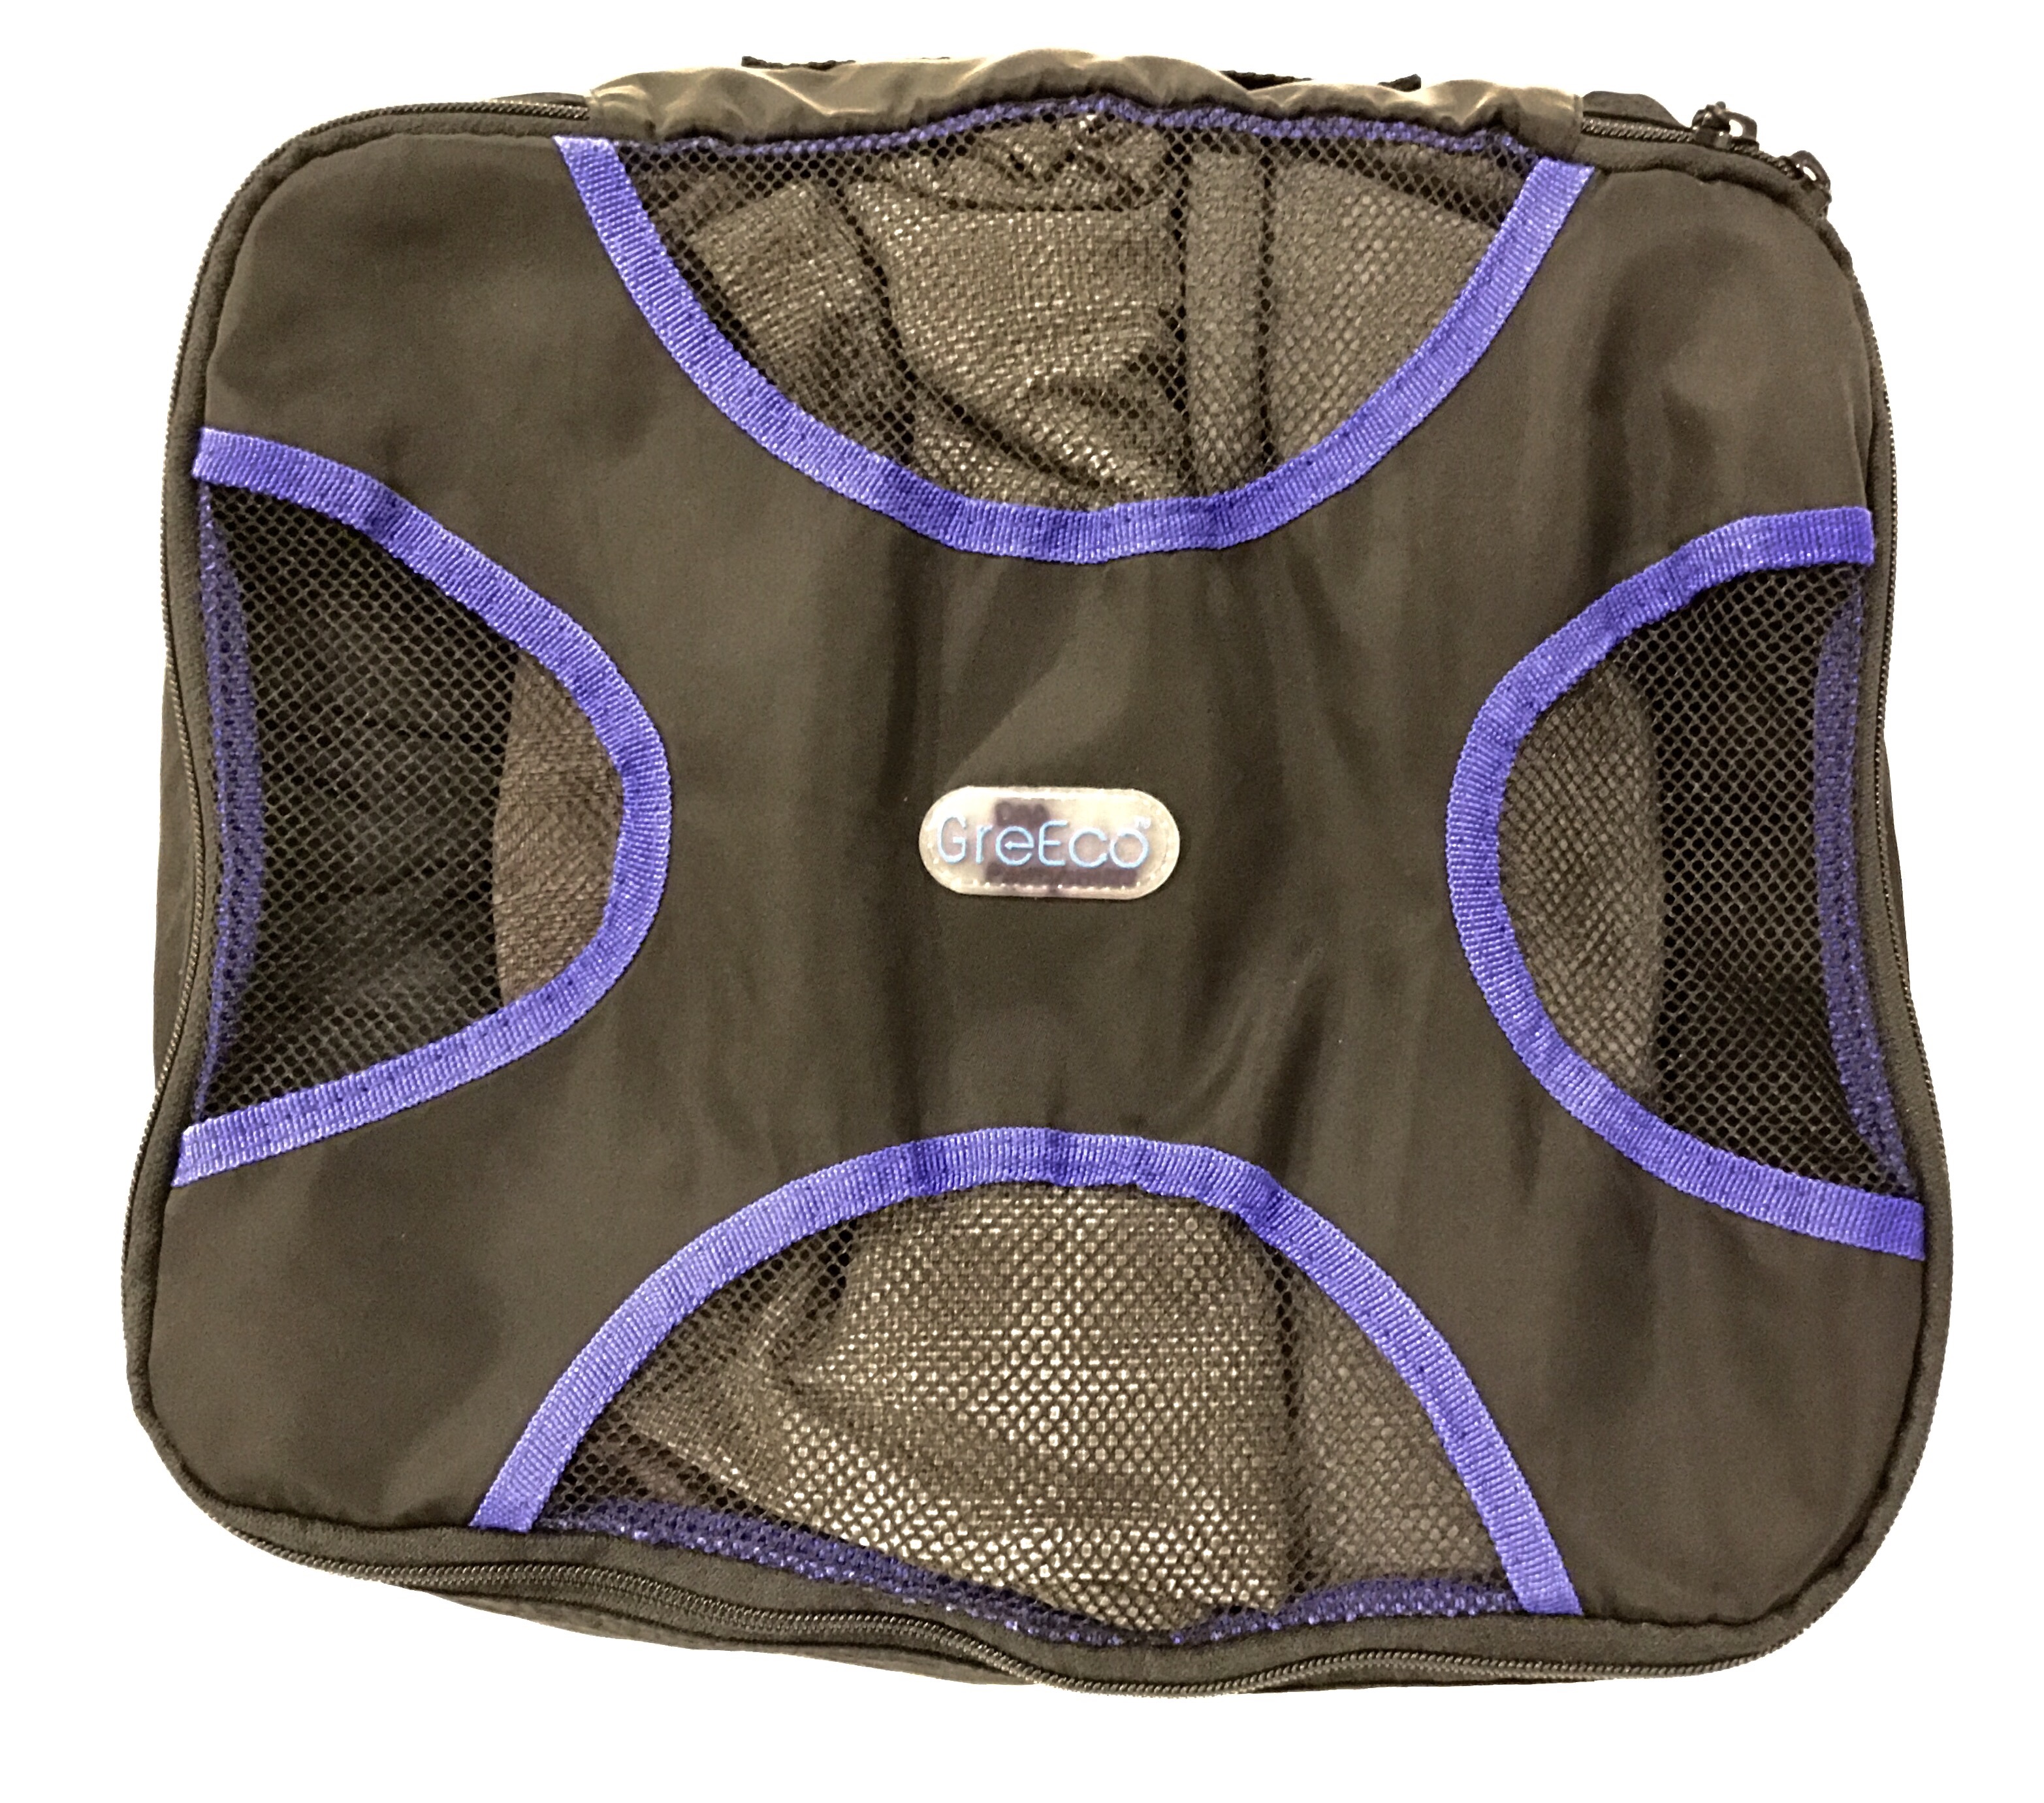
Packing Cubes
Packing cubes are one of those things that you will probably scoff at when I first explain them to you. I know I did when I heard about them for the first time while I was researching for this trip. Believe me when I tell you that using packing cubes is the single most efficacious tip I learned in all of my research regarding packing. It doesn’t make sense and seems counter-intuitive, but just get them and use them. The only way to have packing cubes make sense is to use them, they sell themselves and will make you a raving fan!
If you are unfamiliar with packing cubes, they are generally nylon and/or mesh zippered bags of varying sizes that are used to organize and store clothes in your travel bag or backpack.
The magic of travel cubes is two-fold:
- You are able to separate clothes and shoes within your bag
- You can pack more into your bag (trust me, it is true)
Jocey and I used them for the first time in early 2016 on a wedding anniversary getaway to Hawaii. We were astounded at how much we could easily fit into our bags (when combined with rolling, never folding clothes) and how quickly we could pack and unpack. Typically we will just take each packing cube out of the bag and throw it in a drawer, then when we want shorts for example, I go to my shorts/pants packing cube in the dresser drawer and choose the shorts to wear for the day. When I am ready to pack up again, I just zip up the packing cube and throw it right into my backpack. Compared to what we were doing before, this system is exponentially quicker and more efficient. I would venture to guess that it would be a similar help to most people.


There are a variety of packing cube systems to choose from. We chose this packing cube set from GreEco on Amazon. It has many high reviews, was durable and came with both a shoe bag and a laundry bag. As a family, we used about 2.5 sets for all of our gear. I personally use three medium size packing cubes which hold socks/underwear, shirts and shorts/pants respectively. In addition, I have one shoe bag for my shoes or sandals/flip flops. I also keep a laundry bag in my backpack for dirty clothes, so they are separated from clean clothes. I personally like the medium to small bags best. The large bags still fit in our backpacks fine, but don’t compartmentalize as well since they are larger. The system really works smoothly and truly, like magic!
Electronics
iPhone 7
I was an early-adopter of Blackberry smartphones and a late adopter of the iPhone. Now, our family has taken the plunge to being 100% Apple OS, and have been for several years. I love my iPhone and highly recommend it for travel. It can do almost everything a traveler needs: GPS, internet, flashlight, currency calculator, entertainment, camera, etc. The list goes on and on. The newer phones have solid cameras (all of Jocey’s blog photos are from her iPhone 6 or my iPhones) and they are really durable if they have a case for protection. I began our journey with my three-year-old iPhone 5S, but after getting pick-pocketed in Cape Town (See Jocey’s Cape Town post here) I switched to an iPhone 7 in early December.

iPad Air 2 32 GB
In addition to my iPhone, I also brought an iPad Air for entertainment and as a tool for worldschooling our children. The iPad is extremely slim and fits easily in the laptop compartment or tablet pocket of any bag. The iPad is a travel luxury, not a necessity by any means, but it sure has come in handy when I want to watch the Seahawks play and the rest of the family wants to watch a movie! iPad Air 2 32 MB on Amazon for around $400

Sennheiser CX300II Ear Buds and USB Car Charger
If you plan to work or want to be periodically entertained while traveling, a high-quality and durable pair of ear buds is crucial.
In my opinion, the crucial elements of a set of travel ear buds are the following:
- Inexpensive, so I am not devastated if they are lost or damaged.
- Compact, so they are not bulky (like studio-style headsets) and are easily portable.
- Acceptable sound quality, because who likes to listen to poor quality music?
Right now as I type this post, I am listening to “Electronica for Creativity” on Amazon Prime Music using my Sennheiser CX300II’s that I bought at Costco in 2015 for around $30 (you can also find them at Amazon for a similar price here). I use these every day, without fail. Whether on a train in Europe, a flight to Dubai, a bus in India, a tuk tuk in Cambodia or listening to a Podcast as I drift off to sleep, these ear buds are my constant companion. I am a bit of an audiophile with several bulky headsets at home which deliver incredible sound quality; however, when I travel I am willing to sacrifice some sound quality for convenience. My ear buds deliver on all fronts and I am starting to believe they are virtually indestructible, so durability will not be an issue for you either. If you choose Bluetooth/Wireless headphones, choose headphones that have a wired connection so they are harder to lose.
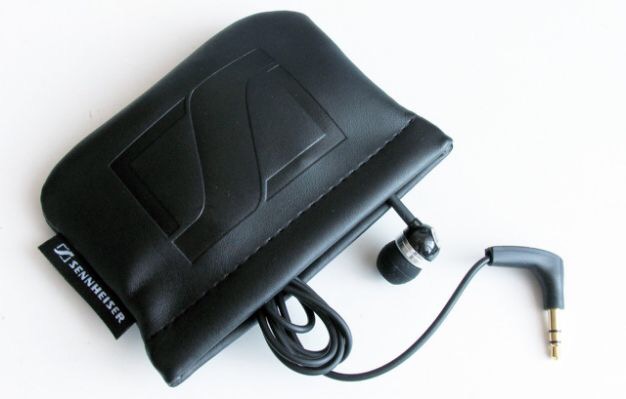
I also tuck a basic USB car charger in my ear buds case for long drives when I need to keep my GPS working or the tunes flowing!
Anker PowerCore External Charger
This powerful and inexpensive insurance against dead batteries in our phones, tablets and computers has bailed us out countless times on this journey! This is an external charger with two USB outlets which allows you to charge your electronics quickly and portably. For $40 on Amazon, this device allows us to charge devices for school, work or entertainment if the power goes out for extended periods of time (as it did often in Botswana), on long car/train/plane trips or if we are at the beach/pool. Although the PowerCore itself takes 12-18 hours to fully charge, one charge of the device will charge an iPhone six to seven times! There are other options on the market now that may be slightly smaller or faster, but this external charger reliably delivers and I highly recommend it.

4-Port USB Charger
This device allows you to charge up to 4 devices at one time via USB link. If you have a family’s worth of portable electronic devices, it is worth every penny. If you are traveling solo, as a couple or with less than three to four electronic devices, it is not needed because you can use the dual USB port on your universal power adapter. Although this is not the exact version we have, I trust the Anker brand (especially when coupled with 2000+ Amazon reviews) and have no problem recommending this version.

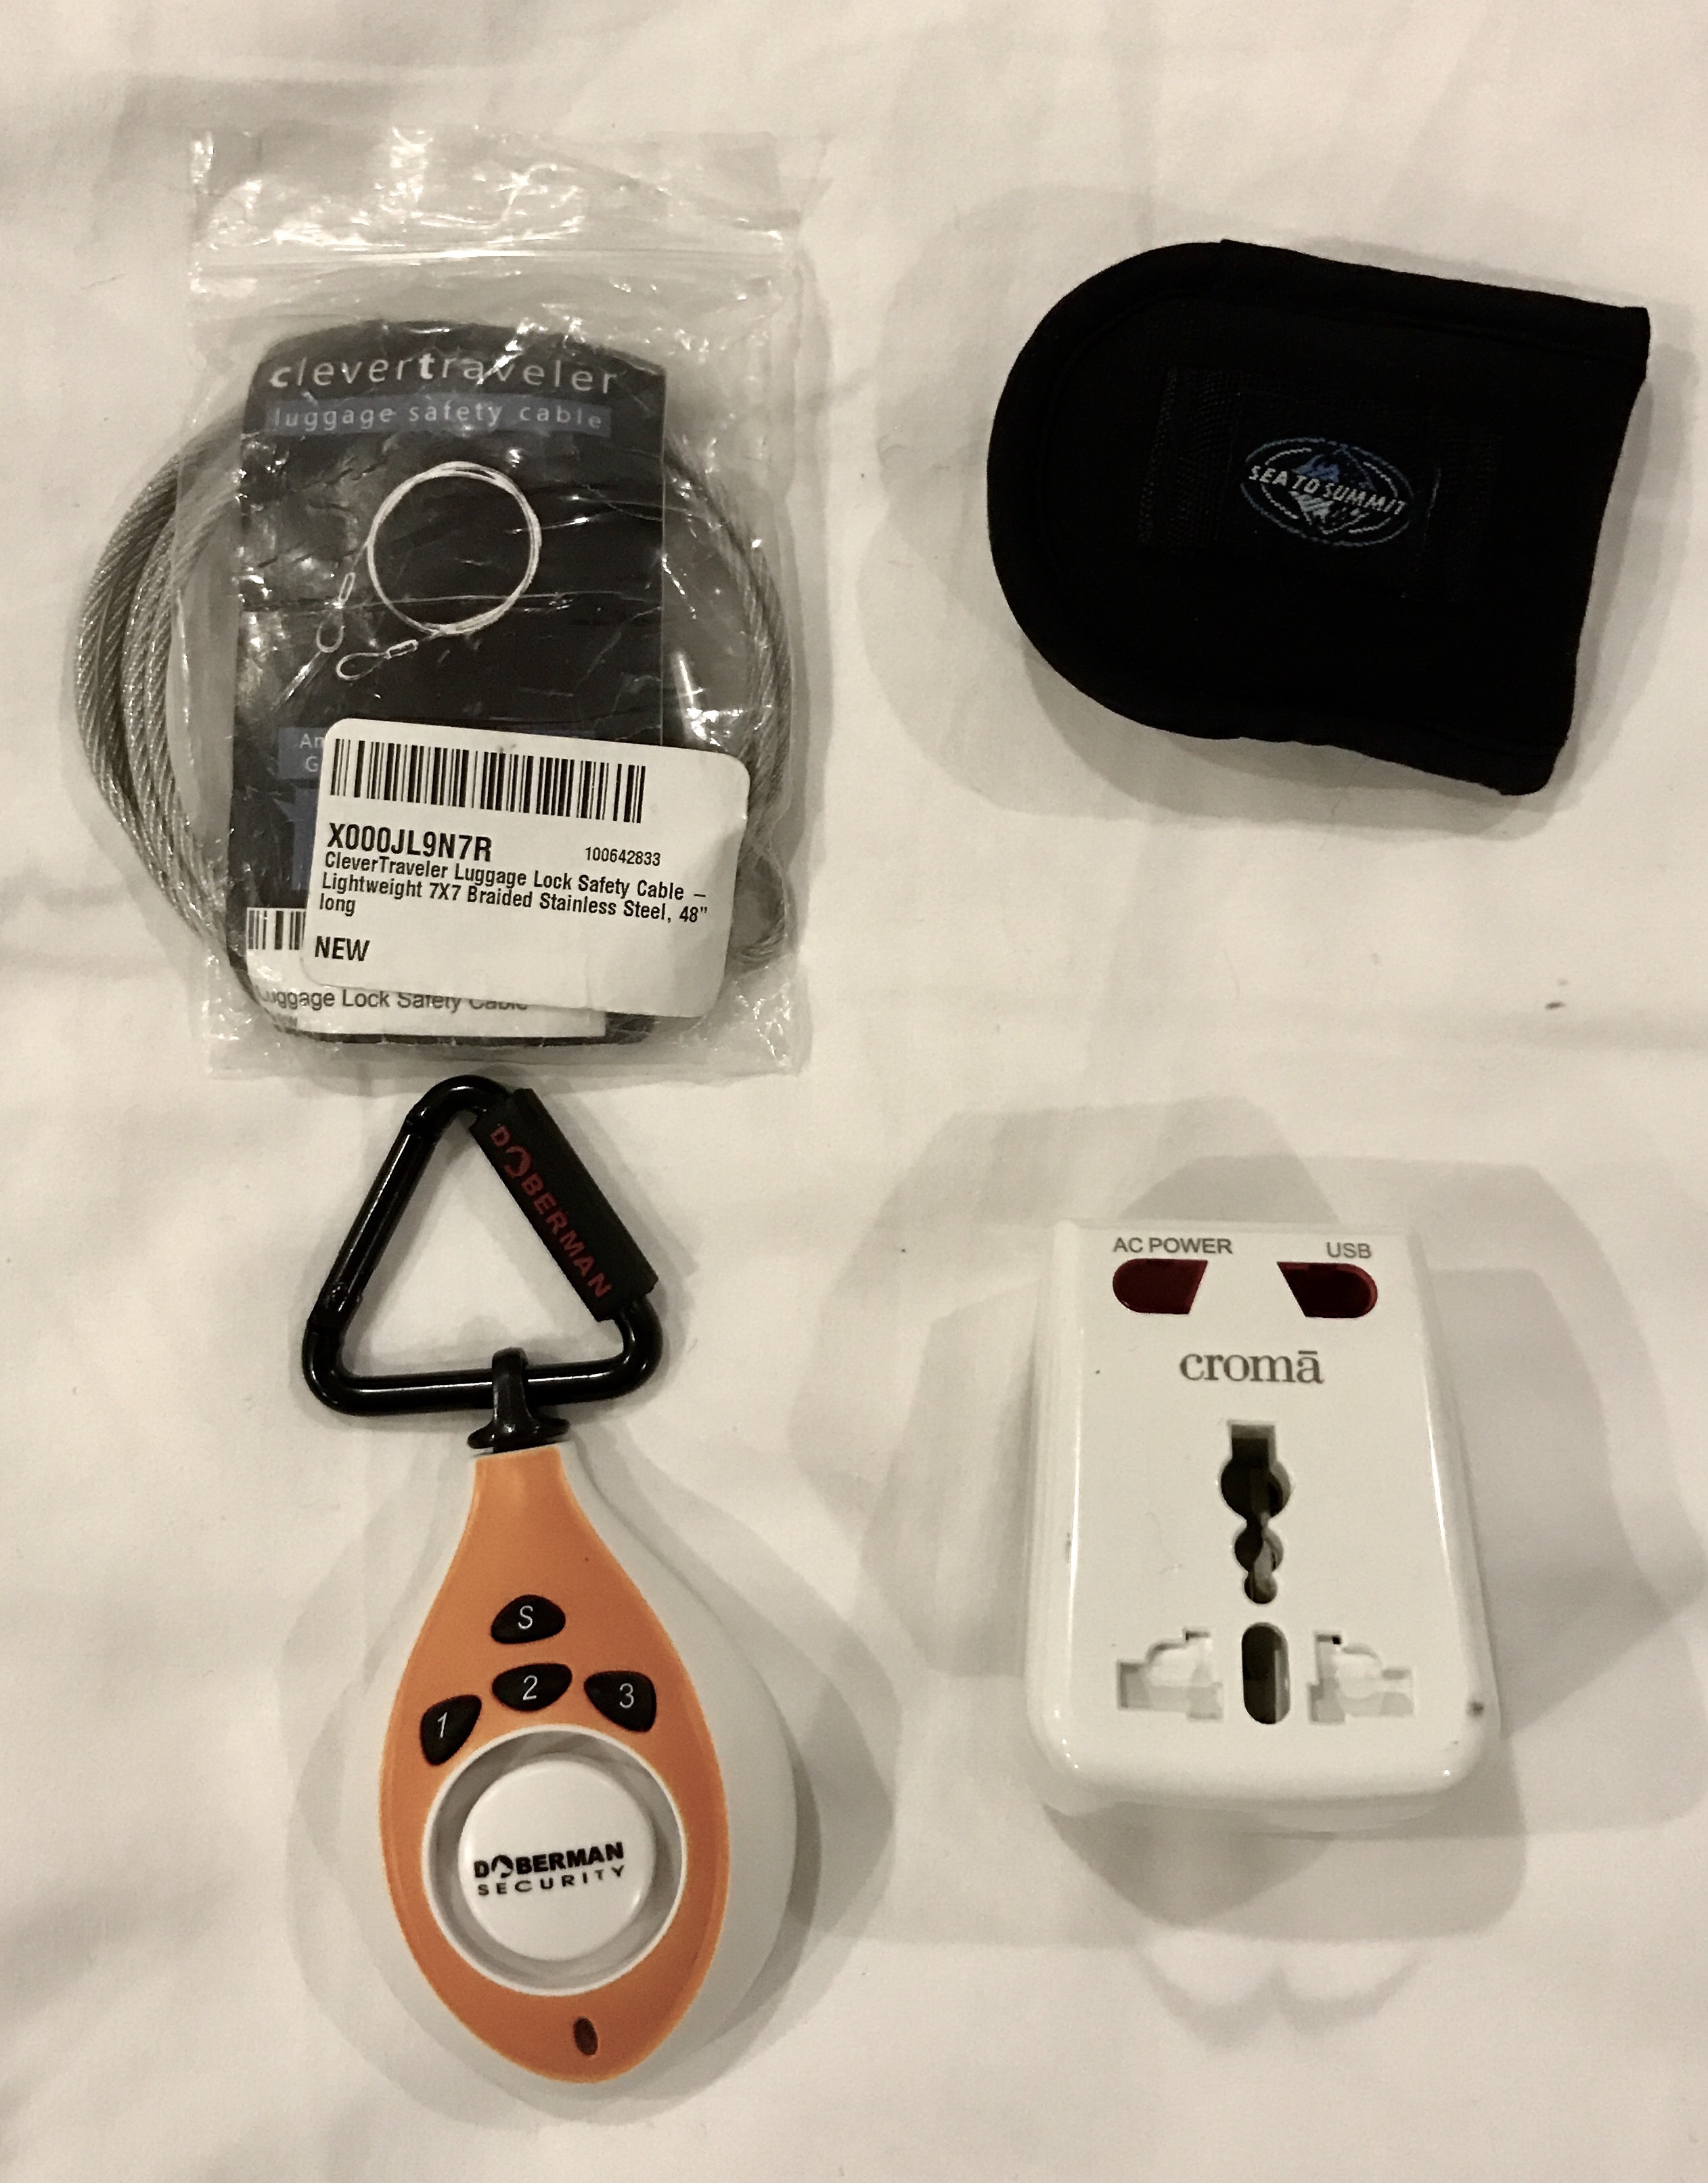
Universal Wall Adapter With 1-2 USB Ports
When you travel internationally, there is no choice but to make an investment in a solid universal wall outlet adapter. The newer models have one to two USB ports built in and it is critical to get one with this feature. Since all of our electronics come with USB cables that disconnect from the wall socket plug we didn’t need to bring any of the various wall plugs on our RTW trip. We only brought the USB portions, our universal adapter and the 4-Port USB charger for insurance. It cut down on bulk from electronics pretty significantly. I loved this model from Pac2Go, which made it for over 6 months of the journey until we accidentally left it in one of our hotels in India. I ended up buying an $8 model from Croma as a replacement and it has worked fine, but it only has one USB port. Get the Pac2Go model if you can. It is worth the additional cost and will last for many journeys.

USB Apple Lightning Cords, HDMI to Lightning Adapter (Plus HDMI Cable), Car Audio Adapter
On our journey we always have three to four USB Lightning cords to charge our Apple devices. Frankly, most of the time we are only charging two devices at once, but it is nice to have the option to charge up to four devices at a time without sacrificing much space in my bag. One cord per person is a good rule of thumb, even if you have multiple devices.
In addition, I like to bring a cord that plugs into the headphone jack of my phone and also into the Aux jack in pre-Bluetooth vehicles, also called a “male to male stereo audio cable”. It allows you to stream or play music through your phone directly into the car’s sound system. Something like this from Amazon will work well and keep you rolling on those long road trips.

Without a doubt, this HDMI to Lightning adapter paired with a short HDMI cable is an item well worth the small investment. This setup allows you to plug your Apple device directly into a TV to watch Netflix or other TV show and movie apps. All you have to do is plug it into the HDMI input on the TV, the other end into your Apple device and start streaming video! In total, I paid around $50 for both items. You can find this short HDMI cable here for $8 and the HDMI to Lightning adapter for $43 here.

Miscellaneous
I also brought five other items which I would put squarely in the optional category because frankly, I haven’t really used them, but they were highly recommended on the travel blogs. A bag alarm, a luggage safety cable, luggage locks, travel towel and a packable clothesline. The clothesline we did use once in Dubai, but otherwise when we needed to hang dry clothes we found it easier to just hang them over doors, chairs or other objects rather than dig in my bag to find the clothesline. The safety items would have come in handy had we been sharing rooms in hostels or were in sketchy hotels. Luckily, this hasn’t been the case and we have been able to put valuables in hotel safes almost all of the time. When we traveled on trains in Europe, we usually held our bags, tucked them under our seats or on shorter rides, just put them overhead and kept an eye on them. These are solid choices for baggage safety if you feel like you need them.
Shoes
1 Adidas Terrex Skychaser Trail Runner, 1 Chaco Z/1 Unaweep sandal, 1 Volcom Radial flip-flop
When you are living out of a backpack with limited space for a year, there may be no single article more critical to your comfort than the one pair of shoes you choose to bring. Your shoes must be versatile, lightweight, adaptable to both city and mountain terrain, neutral color and durable. In my mind, the best class of shoes to bring for these diverse purposes is trail running shoes. They are useful when walking around Paris, yet also up to the task of hiking in the Swiss Alps. They are lighter than hiking boots or day hikers and have a variety of styles to choose from to match your clothes. My shoes had to pull bonus duty by being stylistically benign enough to wear with a white shirt/tie and slacks for church without looking too silly.
I had the luxury of having two different pairs of shoes during our journey: Adidas Terrex Skychaser Trail Runners ($113) and Vasque Mindbender Trail Runners ($80)


I originally wanted the Adidas option because I swear by the “Boost” midsoles in their shoes and have used them in the gym for years. Unfortunately, they were difficult to find and I stumbled upon the Vasque trail runners at REI. I have hiking boots from Vasque which I used for the first time several years ago on a 50-mile hike with the Boy Scouts and have loved them ever since, so when I stumbled upon these and they fit the criteria I purchased them. I was very happy with them and used them for nearly half of the journey, logging exceptionally huge miles in Europe. They were extraordinarily comfortable from day one, performed well and were generally durable; however, my one complaint is that the midsole seemed to break down over time until almost all of the inner shoe cushioning was gone. I bought new gel insoles in Austria, which helped, but ultimately it was best for me to replace these with the Adidas trail runners about half way through. I am 250 lbs. and likely walked over 1000 miles in them, which is impressive in my book and I recommend them wholeheartedly.
I fell in love with the full Adidas Boost midsoles in 2014 and have owned several pairs of shoes with this midsole. Due to my mass and weight, these are simply more durable and comfortable for me over time and the Adidas Terrex Skychaser’s I bought to replace my Vasque’s have delivered. After a couple of months of wear, they are getting even more comfortable than the first time I tried them on. I prefer their styling to Vasque’s as well, but they were not quite as comfortable at first when compared to the Vasque’s.

Overall, if I had another opportunity to choose one shoe for the whole year it would be the Adidas Terrex Skychaser. They meet all of the critical criteria and should be more durable over time based on past experience with similar shoes.
In addition to shoes, I brought one pair of sandals and one pair of flip flops. Both are perfect for long-term travel because they are comfortable and durable, arguably the most comfortable and durable of any sandal, period. I chose Chaco Z/1 Unaweep sandals as my all purpose sandal (retail price is $105, but I paid $63 on Amazon) and despite their being less than fashionable, there is no better choice for comfort and durability than these sandals. I fully believe that I could take only these sandals and no other shoes on this journey and be fine. They work in the city, for hikes and also in the water. They are effortlessly versatile. I might look silly wearing socks with them if it is cold, but these sandals do it all. I walked over eleven miles in them in Paris when I’d only worn them a few times (Abe and Holly Smith can attest!). My feet were not sore the next day and no blisters! They do “break in” over time and get even more comfortable. After seven months, these are still my go-to choice for footwear if the temperature is above 65 degrees.

Note: They are very narrow right in front of the heel. I have never worn a wide shoe, but I had to get wide Chacos to prevent this area from impinging on my foot. I recommend that you consider getting wide Chacos unless your foot is relatively narrow.
My final footwear choice was a solid pair of flip flops from Volcom (here). I have had them for a few years, worn them on this trip and they are still comfortable. My best advice is to get a pair that is both low-profile and has a well-cushioned footbed. Spend some money and for heaven’s sake, don’t buy the cheap ones that will break in a month!

Socks and Underwear
4 Darn Tough light cushion no-show merino wool socks, 1 Darn Tough micro crew ultra light merino wool sock, 8 sets of underwear
Merino wool. If you haven’t heard of it and are an outdoorsman or traveler, you are missing the boat, period. This fabric is truly amazing and has made me a believer in its value despite a higher cost when compared to cotton or microfiber options. It is certainly more expensive than other fabrics; however, it has an amalgamation of properties that the other don’t. Merino wool can be made into a fabric that is thick for more warmth or thin when you want to stay cool. It is more breathable than cotton and is also natural, odor-resistant, temperature regulating (keeps you warm when cold and cooler when hot), soft and wrinkle resistant (among other things). There are rumors that mountain or rock climbers have worn the same shirt for a week, with no offensive odor. While I haven’t stretched my socks that far, I have worn them three days in a row many times with no odor. All you have to do is hang the socks up and let them air out overnight and magically, they don’t smell. This comes in handy when you have the same four pairs of socks for a year and only do laundry every week or two!

I settled on the Darn Tough brand for my socks. They are Made In The USA and have a lifetime warranty. For space and style reasons I chose Darn Tough’s Light Cushion no-show merino wool sock which you can get for $16 on Amazon. After almost 2/3 of the way through our year trip and only having four pairs of socks, they are literally as good as new. I don’t know how they do it, but I have become a Darn Tough fan for life! Highly recommend these amazing socks! I also purchased one pair of Darn Tough’s micro crew ultra-light sock for church or when I need to wear slacks for a night out with Jocey. You can purchase them here.

Shirts
4 Icebreaker Tech T lite, 2 Kuhl Renegade short sleeve, 1 Mizzen & Main Manhattan dress shirt

Are you ready for some more merino wool talk? Of course you are!
Well, this section is pretty simple to write. I have only two primary shirts for everyday wear, just in different colors. Yes, four of my shirts are merino wool made by Icebreaker from New Zealand, titled the Tech T lite. Best T-shirt ever! Like my socks, I have worn a single shirt three days in a row many times on this trip and I am embarrassed to admit, up to five days without washing. It doesn’t smell and after seven months they still look good. The one caution with these shirts is that they should not be machine dried because they will slightly shrink and decrease durability over time. They hang dry in just a few hours so it isn’t a huge issue, but something you should know about going in if you choose to try them out. I am pretty sure these will be my go-to T-shirt from now on, even after I return home. The biggest downside to merino wool is that it is expensive, retail price for the shirts I have is $75-$85. Very steep…BUT there is some good news. I paid $35-$50 for mine by scouring Amazon (here) and the internet. In addition, if you live near Portland, there is an Icebreaker outlet store at the Woodburn Factory Stores where you can find them for less than $50 typically.

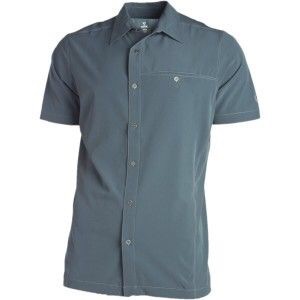
The other shirt style I have is the Kuhl Renegade short sleeve shirts ($70) that I bought from REI (or online here). I have two and I like these shirts because they are comfortable and durable. They are best for mild temperatures as they are warmer than the Icebreaker T-shirts, especially when the temperature is above 85 degrees or humid. These are usually what I wear on travel days because of the front pocket and baggier nature of the shirt.
For church and dressing up, I have one option, a white “Manhattan” button-up shirt from Mizzen & Main that I purchased for $125. This company only uses moisture-wicking, wrinkle free, four-way stretch fabrics which are uber-comfortable and have been great for this journey. I can pull the shirt out of the packing cube and within a few minutes of wearing it, the shirt is relatively wrinkle-free. It also packs very small and has been stain-resistant as well. I really like it and would buy it again. In addition, I have one other shirt that is just a PGA Tour microfiber golf shirt from Costco. It cost me $20 and works well without breaking the bank.


Pants/Shorts
3 Microfiber shorts, 1 Adidas workout short, 1 Boardshorts for swimming and 1 Bluffworks Originals pants

My thought process with shorts was to bring four-way stretch microfiber shorts like these for comfort and durability, as well as the important feature of packing small. I went to the Quicksilver outlet in Woodburn and picked up the three pairs of shorts above that fit this bill. I am not tied to the Quicksilver brand, but they have worked out perfectly. I also brought a pair of Quicksilver boardshorts and a pair of Adidas workout shorts for swimming and the gym respectively.

In this category, the most interesting item is undoubtedly my travel pants that I purchased from Bluffworks. These Bluffworks Originals ultra-lightweight travel pants are amazing! They are the most comfortable pants I own that are not custom tailored and are versatile enough to wear to church, tour a city or hike in. They have been incredibly durable and wrinkle-free as well. The security features really set these apart from other pants and make them worth the cost, $98 on the Bluffworks website. Three of the four primary pockets have zippered internal pockets and there is also a hidden pocket on the front of the pants for small articles. If I had been wearing these at the soccer game in Cape Town I would not have had my iPhone 5S pick-pocketed!


Clothing Accessories
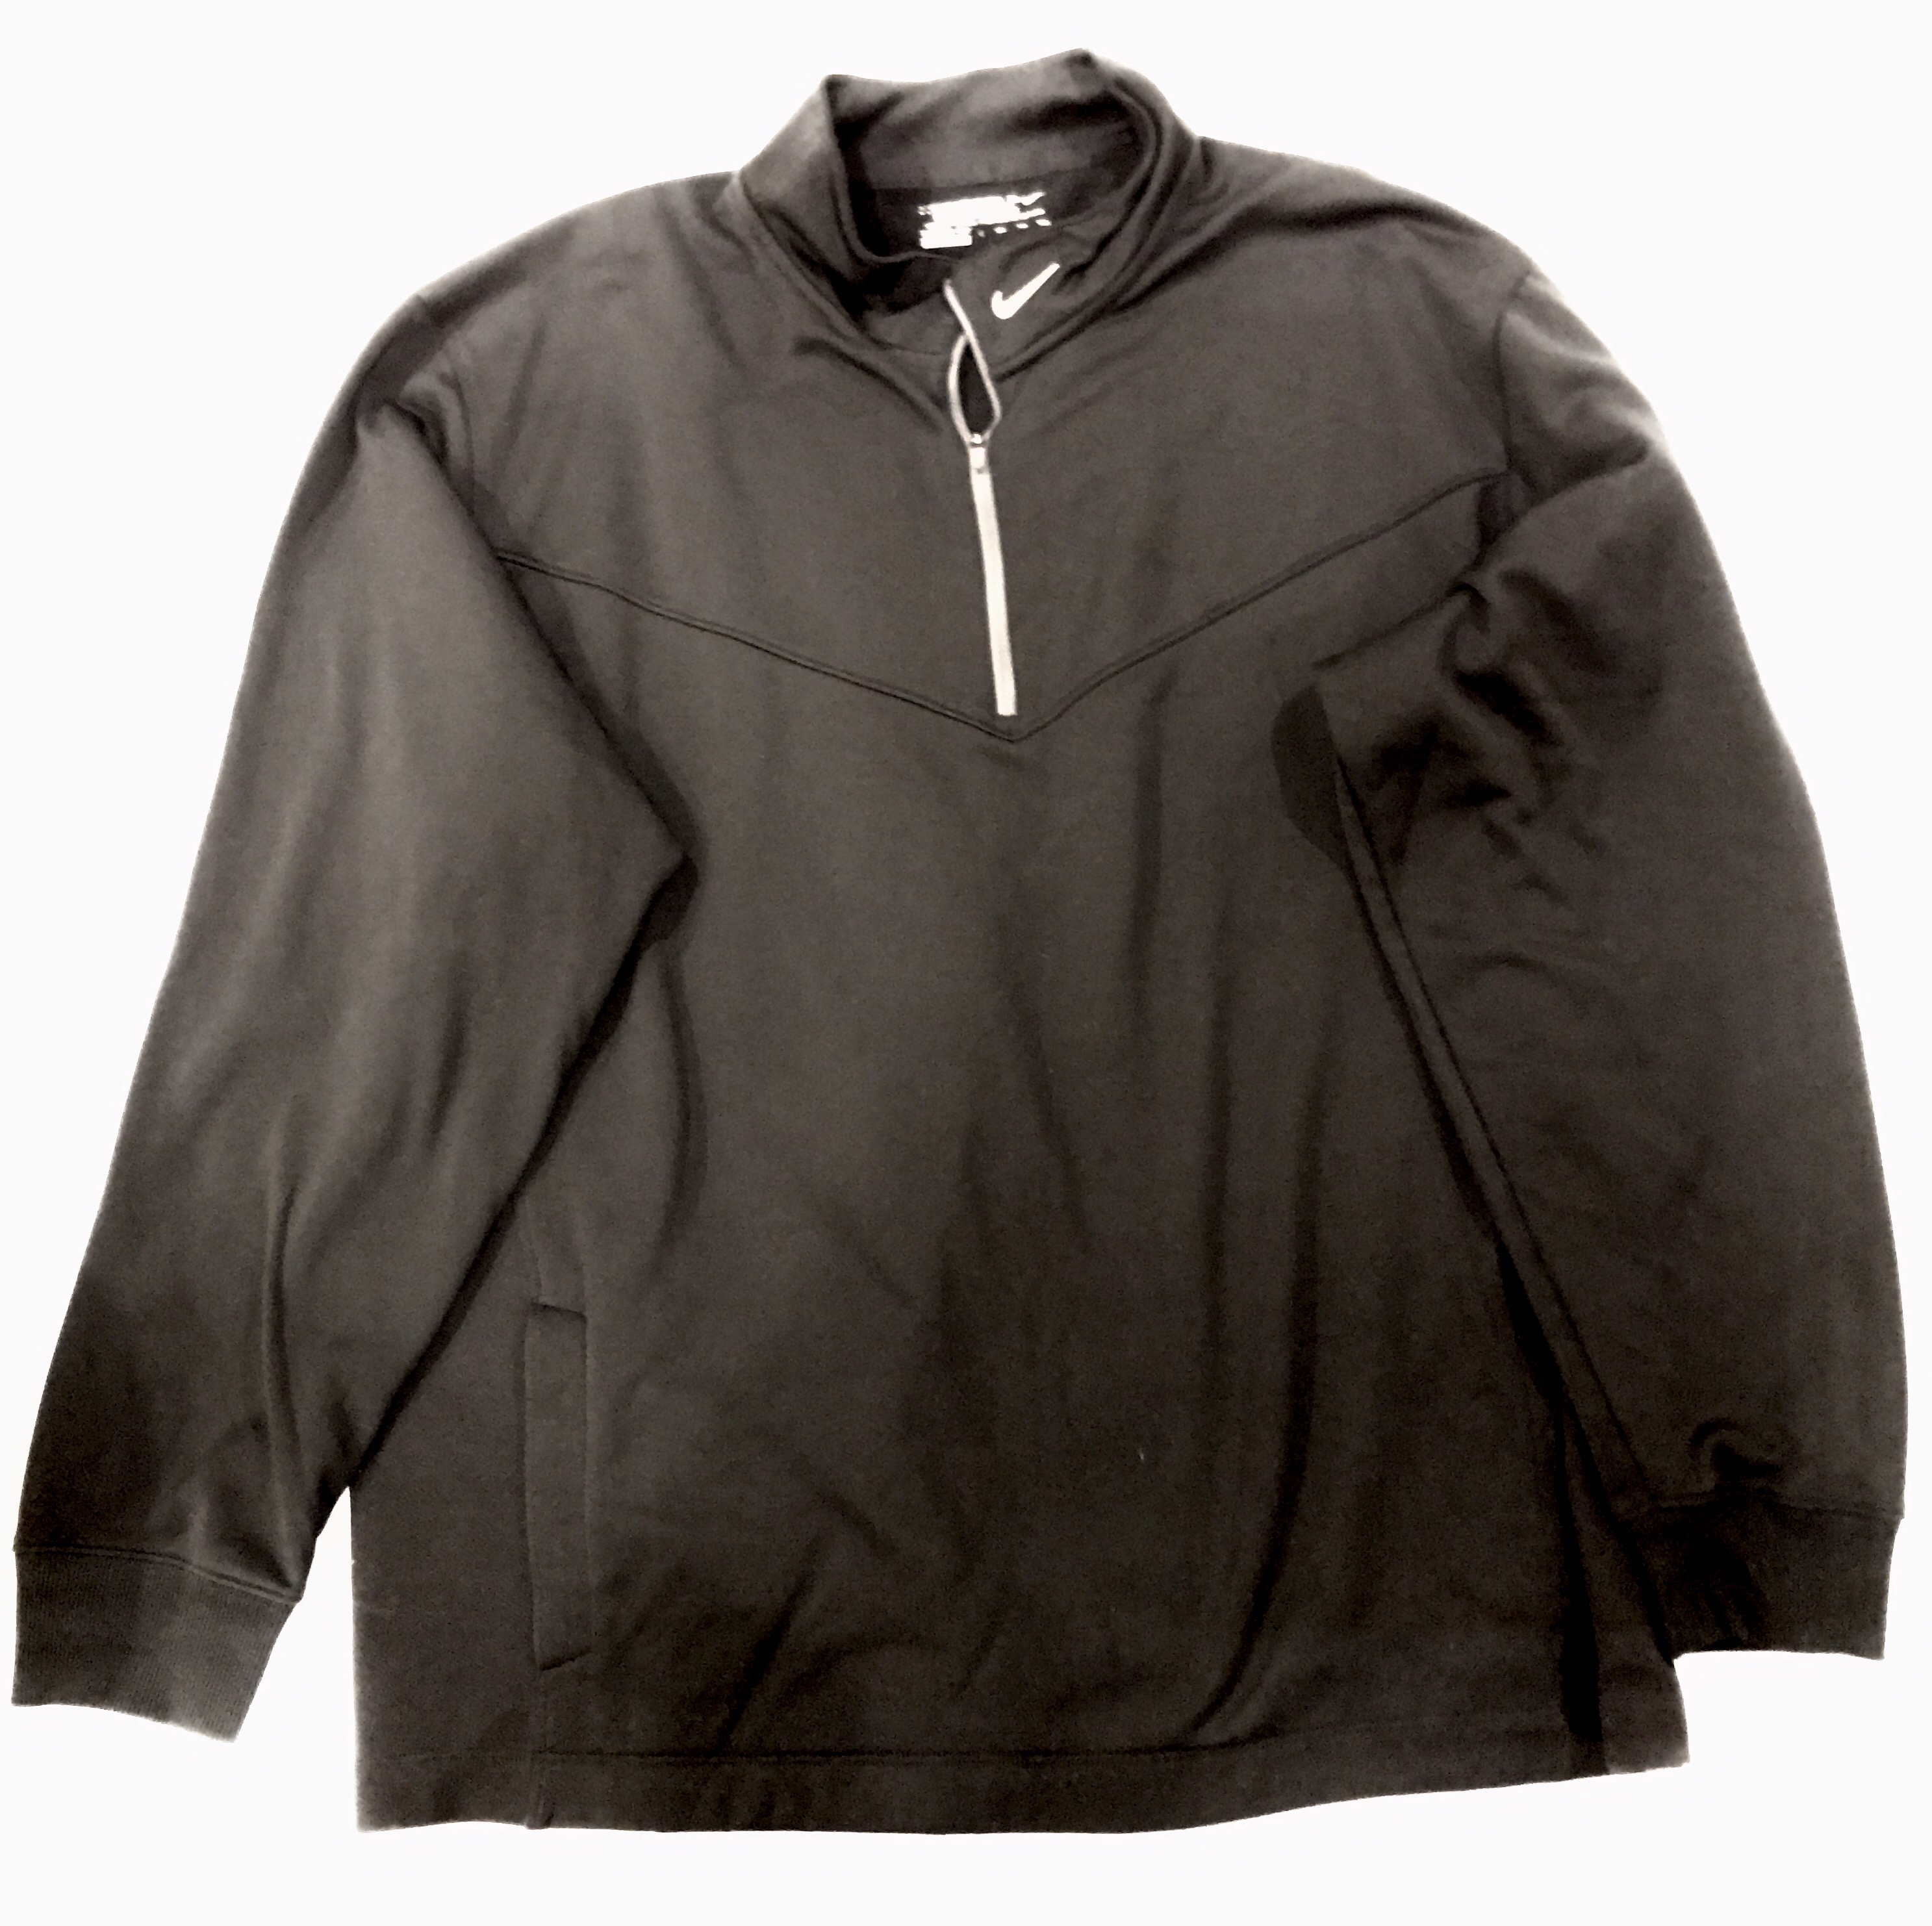
1 Nike Golf half-zip Therma Fit cover-up, 1 Columbia Turner Shell rain jacket, 1 Columbia Coolhead Ballcap III
Rounding out the clothing in my RTW backpack are several items that have worked fantastic for me on this trip. The general principles for choosing these items stay the same: ultralight, packable, and durable.
I highly recommend the Nike Golf half-zip Therma Fit cover-up. Over the past few years I have had three of these thin, durable sweatshirts. It is not great for freezing temperatures, but it performs beautifully in mild temperatures. I use this as a pillow on planes, trains and buses, as well as tie it to the outside of my bag when it is fully packed. It looks as good now as the day I left. You can find it here on Amazon. Price varies, but I think I picked mine up for about $50.
My Columbia Turner Shell waterproof/breathable light rain jacket has been great for the few times when I really needed it. It packs up small and is helpful when it is rainy, or I use it as a second jacket over my Nike sweatshirt to stop wind or when it is very cold. This combination has kept me comfortable in temperatures to freezing and slightly below. Any packable, ultra-light, waterproof rain jacket will work, or you can pick this one up for around $50 on eBay.

I love the one hat I chose for my journey. It was actually the last item I purchased (at PDX en route to Iceland) in the US the day we left. The Columbia Men’s Coolhead Ballcap III is a perfect choice for ultra-light packing, is rated to SPF 50 and has a cooling mechanism embedded in the hat band to keep you cool when it is warm. I think the cooling aspect of the hat is a bit of a marketing ploy, with its functionality wearing off relatively quickly, but I recommend this hat to any traveler. You can find it on the Columbia Sportswear website for $32.

Toiletries
1 of each: NeatPack toiletry bag, toothbrush and cover, toothpaste, floss, hair product, anti-perspirant/deodorant, tweezer, nail clippers, Q-tips, razor
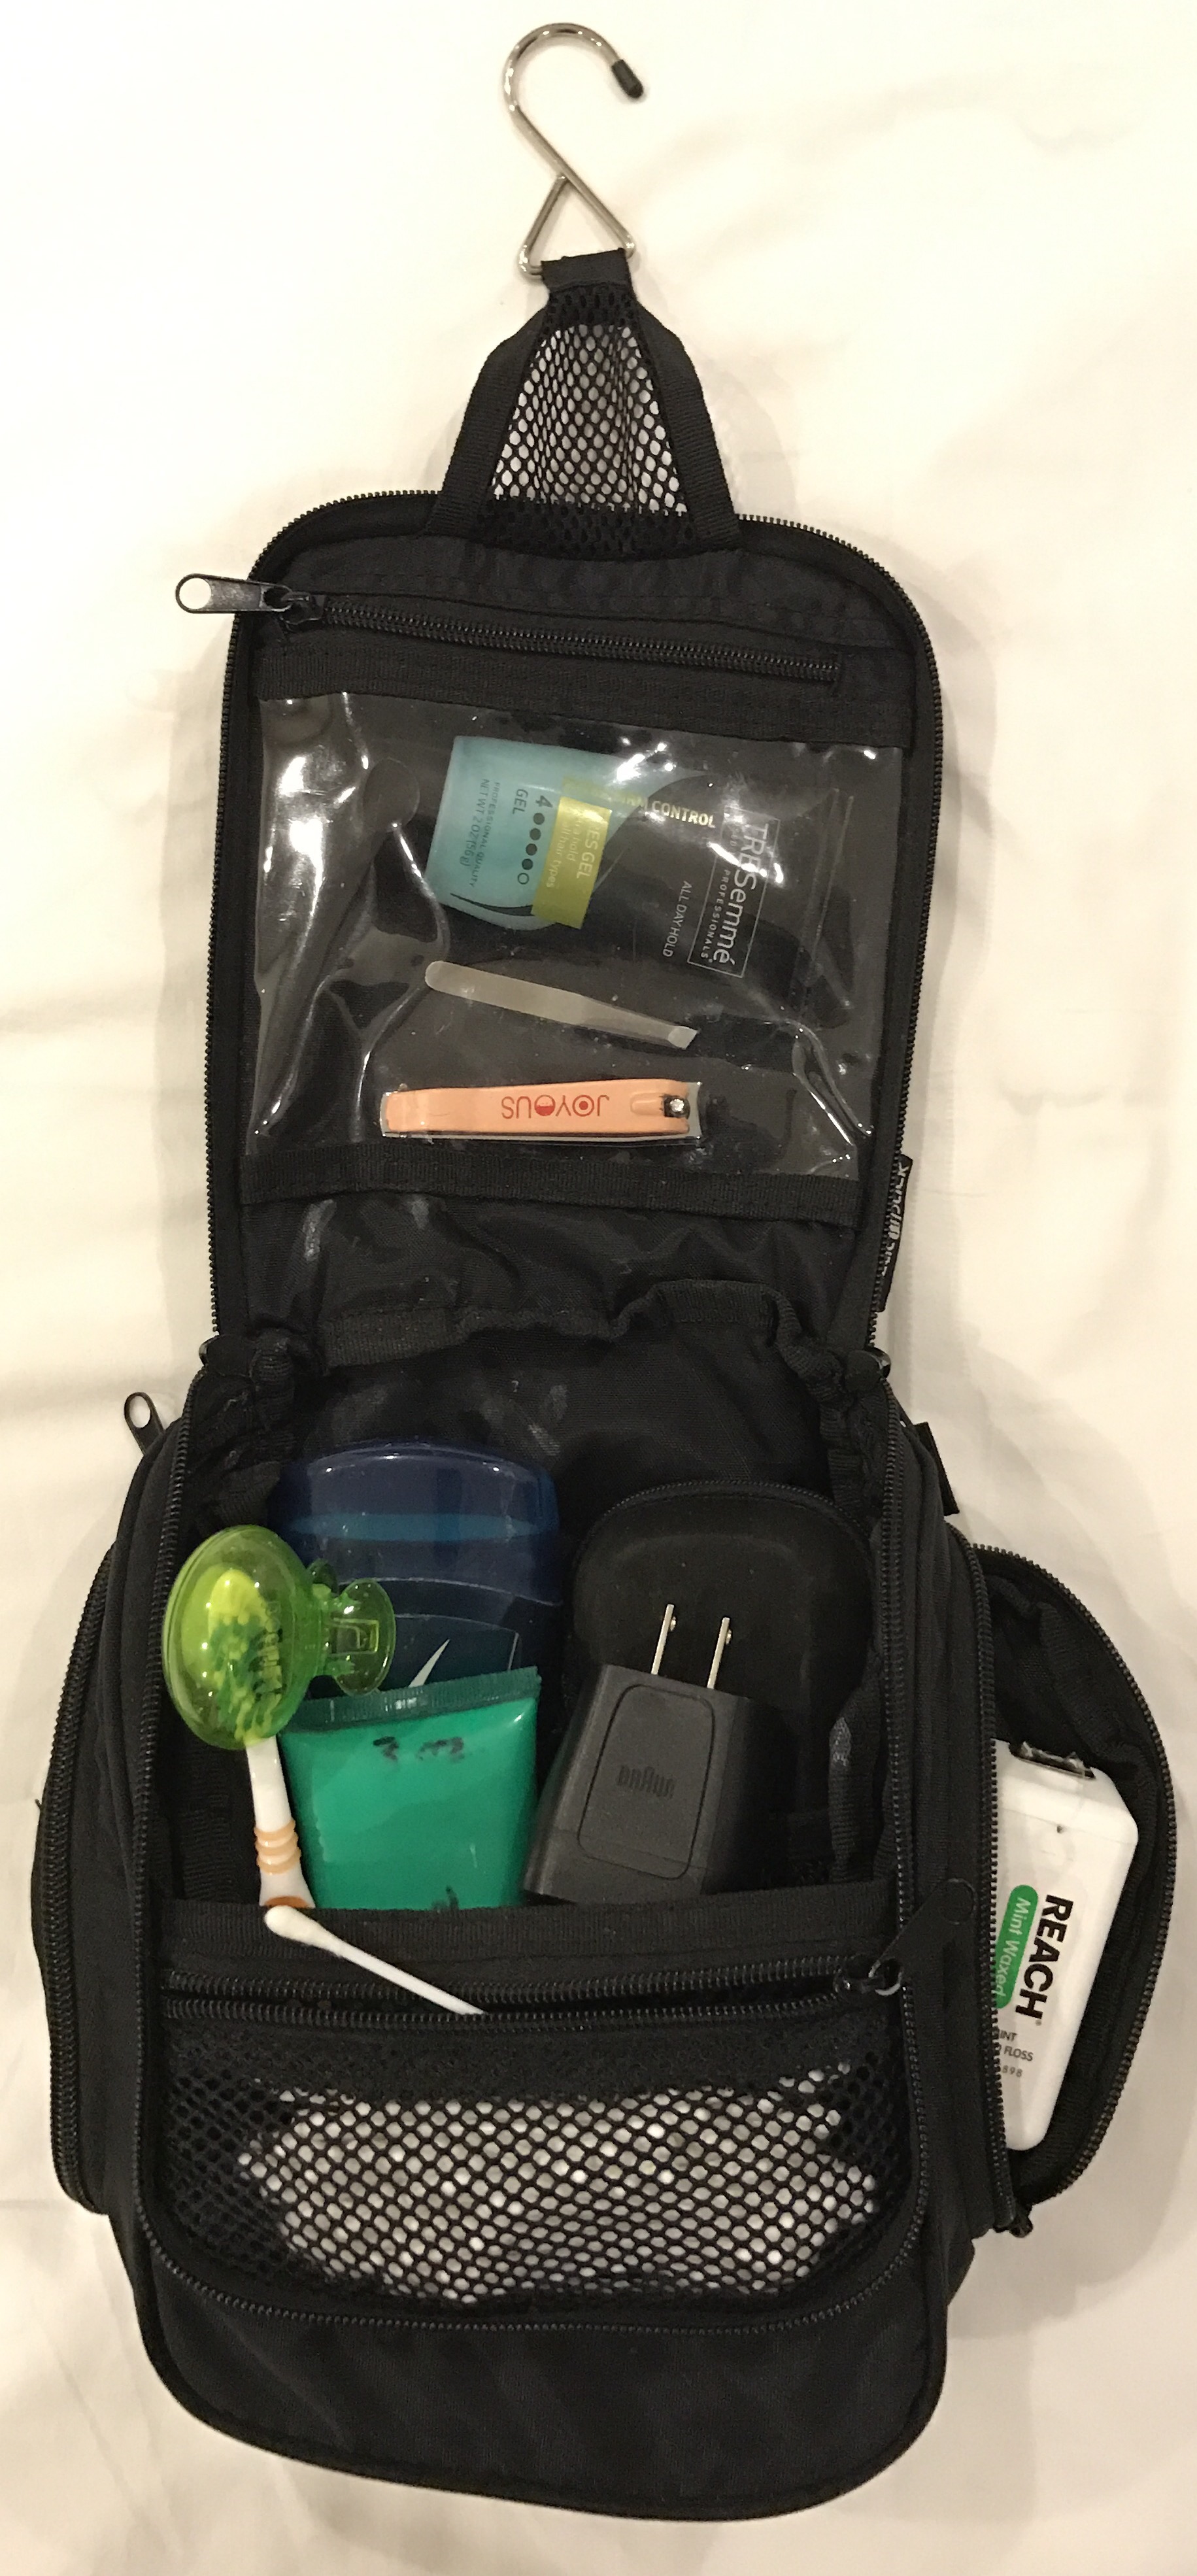
This section begins with one of my favorite items I purchased for this journey: the NeatPack compact, hanging toiletry organizer. You can find it here on Amazon for $16. We have stuffed it chock full of toiletries for the whole family, but it is easily small enough to handle items for a single person without taking up much space in your bag. The hanging feature is the key to this bag, which is a life saver when you are traveling in small hostels or hotel rooms with little counter space. When I unpack, I simply unzip it and hang it on a towel rack, doorknob or the like and keep the small amount of counter space free for other items. I will use this item for my full time travel toiletry bag when I get home as well. You can’t go wrong with this item!

The other items are pretty generic, so just take what you prefer, but be sure to consider how much space will be used and if you really need it before taking anything.
Summary
So there you have it! The anatomy of my RTW backpack along with some tips and suggestions from yours truly. After nearly eight months of RTW travel with my family, plus the research I completed prior to our departure, I may perhaps qualify as a packing expert.
I am happy to help if you have any travel or packing questions, or if you have any questions about this post. Please comment on this post and I will respond as quickly as I am able.
Happy travels!


Great post! What a area to be an expert in. Hope to put your advice to use one day.
Can attest to what you say about Darn Tough socks and Bluffworks trousers.
Love that we made the post.
Travel on my friend.
LikeLike
Thanks for the encouragement Abe! I’m glad you enjoyed it. See you in about 3.5 months!
LikeLike
Very comprehensive! Love it! Forwarded to fam and friends.
Way to go on this adventure….just amazing. My husband’s family, when he was a 10 yr old boy, took them out of school and sailed around the world on the ship abroad for 6 months. It gave them such a gift of an adventurous life, respect of our small world and peace. Your trip is doing the same. Way to go J&J!
LikeLiked by 1 person
It is so nice to hear from you Christine! Thank you for the kind words and encouragement! – Jeromy
LikeLike
Welcome info! I’ve been waiting for this. 😊
Would love to see Jocey’s packing list as well.
LikeLike
Thanks Sherry! Maybe I can talk her into that, but no promises! – Jeromy
LikeLike
Awesome post. I shared with some family.
LikeLike
Thanks!
LikeLike